


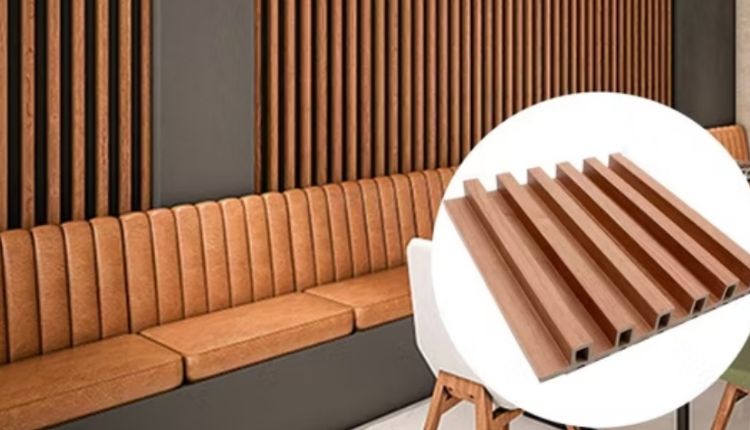
What makes slat panels different
Slat panels combine slim wood battens with an acoustic or felt backing, creating a rhythm of shadow and texture that flat drywall cannot match. The profile adds depth, so light glides across the grooves during the day and reads warm under evening lamps. Because the slats are uniform, they bring order to a space; because the wood is real or veneered, they bring character too. You can lean modern with blackened oak, keep things airy with natural oak, or drift rustic with walnut tones. Designers rely on them for feature walls, TV backdrops, headboards, and hallways that need a lift without clutter. The bonus is sound control; the spacing between slats and the backing help soften echo, which makes open-plan rooms feel calmer.
Design ideas that work in real homes
A single feature wall can anchor a living room, especially behind a sofa or media console, and the vertical lines make low ceilings feel taller. In bedrooms, half-height panels behind the bed frame create a custom headboard look and protect the wall from scuffs. Try wrapping a corner for a boutique-hotel effect, or line a narrow hallway to turn a pass-through into a gallery. If your room runs dark, choose lighter wood and pair it with warm white paint on adjacent walls; brighter rooms handle deeper smokes and walnuts well. A renter friend used removable adhesive strips on a small, framed panel behind her desk, then took it with her at move-out.
Lighting earns its keep here. Slot a slim LED strip in the ceiling wash, add picture lights, or angle a floor lamp so the slats catch a gentle glow. To explore finishes and dimensions before you plan cuts, many people browse slat wood wall panels for inspiration, then refine choices to fit their furniture, flooring, and natural light.
Acoustic benefits without studio vibes
You do not need a recording studio to appreciate quieter rooms. Slatted walls can raise sound absorption significantly compared with bare gypsum, especially for mid to high frequencies that cause chatter and TV glare. Place panels where sound first reflects, such as the wall opposite a sofa or along the sidewalls near speakers. Pair them with soft furnishings you already own, like rugs and curtains, for a balanced approach. In home offices, a single wall behind your webcam cleans up the backdrop while cutting the faint echo that microphones exaggerate. Nurseries and shared apartments benefit too, since absorbing just a slice of reverberation makes conversations clearer at lower volumes.
Planning and measuring
Start by sketching the wall and noting outlets, switches, and vents. Measure the full width and height, then divide by the panel dimensions to estimate quantities; add 10 percent for cuts and pattern alignment. Decide on orientation; vertical slats elongate walls, horizontal lines stretch them visually. If baseboards or crown moldings are staying, measure reveals so the first and last slats land cleanly. Inside corners look best with a crisp return or a corner trim, and outside corners benefit from a protective edge if the area gets traffic. Order a sample of your top two finishes to check undertones against your flooring and daylight; wood can shift from honey to greenish depending on the room.
Installation basics you can handle in an afternoon
Prepare the wall
Clear the area, remove plates, and fill major divots. Studs typically sit 16 inches on center; mark them with painter’s tape if you plan to screw panels on. Wipe dust so adhesives grab well, and prepaint any visible wall gaps a matching dark tone if your panel backing is black or gray; that small step hides micro gaps.
Cut, align, and fix
Dry-fit the first panel with a level since it sets the line for everything else. Cut panels using a fine-tooth blade; score veneer faces first to reduce tear-out. For permanent installs, use construction adhesive plus screws into studs for security, spacing fasteners evenly along slat centers. If you need more flexibility, adhesive alone on clean drywall can hold surprisingly well for smaller sections. Stagger joints so seams are less noticeable, and keep consistent spacing if you are mixing full and cut panels.
Finishing touches
Reinstall outlet extenders so faceplates sit flush. Cap exposed edges with matching trim or paint the edge slats to blend. If your floor is uneven, scribe the bottom edge for a tight line or add a subtle shoe molding. A dab of matching wood filler hides tiny brad holes, and a quick wipe with a microfiber cloth removes installation dust so the grain pops.
Care, durability, and everyday living
Maintenance is friendly. Dust with a soft brush or vacuum using a bristle attachment; follow with a slightly damp cloth if needed. Most veneers handle the occasional splash, though wood prefers stable humidity, so use a small humidifier in very dry winters. In kitchens and entryways, choose mid-tone finishes that disguise scuffs, and consider panels with tougher topcoats for high-touch zones. If sunlight is strong on one wall, rotate art and decor seasonally to keep tones even over time.
Budgeting smartly
Costs vary by material and height. Expect a broad range from budget composites to premium wood veneers in the low-to-mid double digits per square foot, with thicker slats and taller panels landing higher. Compared with custom millwork, pre-made panels save labor and predictability, and DIY installation saves even more. Stretch the budget by paneling one impactful wall, then echoing the wood tone in a coffee table or frames around the room. The result feels custom without rewriting the entire renovation plan.
Foto door Rodrigo Neto op Pexels: https://www.pexels.com/nl-nl/foto/organische-woonkamertafel-20952757/